Books, Scooters and Birdies, Oh My!


A quilt for my cousin's newborn baby girl. I had some cute girlish fabrics I've been wanting to use, but made sure to balance the pale pink with bolder colors, and the dark grey to add contrasty geometric shape, for baby's visual interest. Book print and scooter print! It's fabrics like these that make it so hard not to fabric shop all the time.

Turtle Quilt


And here is a quilt for a baby whose parents are mad about turtles and turtle conservation. When I spotted the navy turtle print fabric, I bought it right away, even though baby turtle was still a wee embryo at the time. I decided, for a change, to go for a bright, bold palette, and tried a new pattern. From my collection (aka addict's hoard) of fabrics I found a yellow, red and turquoise prints to complement the turtles, all with small plain-ish repeat patterns so as not to take away from the turtle detail. And for a pop of irregularity, the forest print white fabric. Often upon quilt completion, I consider keeping the quilt for myself. So I need to pack it up and send it ASAP before I change my mind.

Map Quilt


Quilting time again, this one for my second nephew, arriving shortly :) His room theme is "maps". What came to mind first was a literal translation, looking for a fabric printed with e.g. a World Map. In my fabric hunt I found this lovely Tracks, Roads and Rivers print - and thought, how much more fun is this? When he's older, he can trace the paths with a little train, car or boat, to visit various animal friends and parkland. 

Divvying up the green fabric would take all the fun out of the print, so I left a large piece as a center panel and framed it with squares of destinations. How I love quilting! If only I had more time.


Of Contractions, Angler Fish and Quilting

I'm having a fake contraction right now. Fake in that it's not a real labor contraction, but my uterus is doing perhaps the equivalent of a slow motion bicep curl, in preparation for the real thing. I'd never heard of these practice contractions (fancy name: Braxton Hicks) before pregnancy. They started in late 2nd trimester - I thought it was the fetus curling into a tense ball. Now that the baby is, apparently, as long as a stalk of Celery - oh my bad, we're on Leek week now - it is as if Medusa glanced over and hardened my abdomen into a watermelon sized rock. The uterus is like a wide rubber band around the fetus, my OB says. So during these contractions, my abdomen distorts from a relatively symmetrical spherical mound into a landscape of two hillocks (which I've decided are the right shoulder and butt) with a steep side (the back) and a gentle slope leading to a valley of arms and knees, fetal position of course. The feet stick out of my right side, like the tail of a male deep sea angler fish after it has fused itself to its mate (if you don't know about angler fish mating habits, look it up, it's fascinating.)

All that aside, I've finished my windowpane quilt! I did not document in progress - with the end in sight, it was hard to pause during the throes of sewing to take pictures. Plus, I'm under a deadline here, and wanted to get on with things. In brief:
- I pieced together the front, and then the back (see below). I'd decided to add a quilted stripe made of some excess fabric. The green dot fabric is flannel.
- Sandwiched a sheet of batting (insulating material, like thick felt) between front and back
- Sewed through a 3 layers to hold everyone in place (about 5 parallel vertical rows of stitching between the squares and 6 rows horizontal)
- Trimmed all over so all 3 pieces were same size
- Made fabric tape (that blue edging, no it's not sticky like tape tape) with my tape maker
- Wrapped tape around all edges, pinned down and sewed on

It's not totally straight, but I am fine with that. I'd say this was my most challenging quilt thus far. Of course I'm keeping it, it's for my kid. A shame about my swollen hands - they complained bitterly throughout these final stages, especially when forced to use the seam ripper, or to tie knots in thread. If I didn't have hand issues perhaps I could whip out a few more quilts and such - especially now that My Edits are Done!!

Quilt Update, A Brief History of (My) Sewing and Revisiting the Giant Tree Hopper


Here's how my quilt is coming along. I believe I last left you with a whole bunch of cut out squares. I additionally cut out measured rectangles of elephant fabric, and then sewed columns of fabric together to form 9 long strips (5 of which were long gray only rectangles, and the other 4 comprised of diff fabrics). I pinned strips together before sewing to make sure rectangles were parallel - I've just pinned on a gray strip above, and will sew along my fabric pencil line leaving about 1cm of seam.
The underside. In those strips comprised of different fabrics, note that I iron-opened the seams flat before sewing strips together. This prevents having to sew over more layers of fabric than necessary (2 layers thick at most, instead of 3), reducing lumpiness and sewing machine unhappiness. I am trying to be very neat in this project, as opposed to the Laissez-Faire attitude I usually have towards sewing.

I credit 2 sources for my sewing know-how. First my Mom (thanks Mom!) who has sewn stuff up for me from Japanese stuffed animal kits to a high school formal forest-green velvet dress. She had me machine sewing easy stuff from a wee age - following old school tissue paper patterns as well as improvising our own; and blind-stitch hand-hemming - which is incredibly useful for a short person like myself. Second, in Home Economics class, (British, Hong Kong) middle school - boys and girls learned to machine sew and dye stuff.

Since then, I've partaken in a plethora of sewing experiments of my own, such as clothes (I quickly learned that it is much easier and funner to shop for clothes), animal-themed costumes for museums/Halloween, and art projects such as the Tree Hopper (circa 2004) below, which you may have seen before.

Tree Hopper is approx 4' x 4' x 8', sewn on an ancient Singer with 2 stitches - straight and zigzag, and made of hand-dyed and airbrushed cotton canvas, industrial yellow vinyl, cotton cord for wing veins and internal plastic tubing for structure. Can I say, it was a pain in the butt to stuff this thing under the sewing machine arm.  It only worked out because I had the distraction of Harry Potter Audio Books to keep me going - that plus Michigan snow kept me indoors. Anyways, minus all the stuffing, which I donated to the UMichigan Art Dept for re-use, Tree Hopper now fits nicely in a large box in our pantry. It was way too much work to just toss, but what does one do with a deflated giant Tree Hopper carcass?

Window Pane Quilt In Progress Part 1


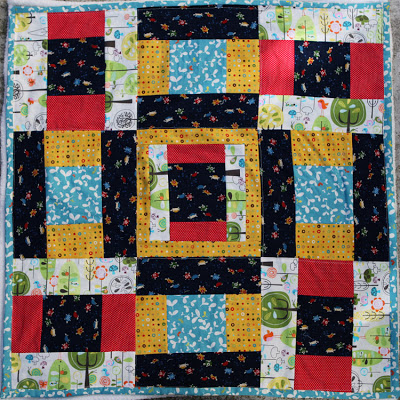
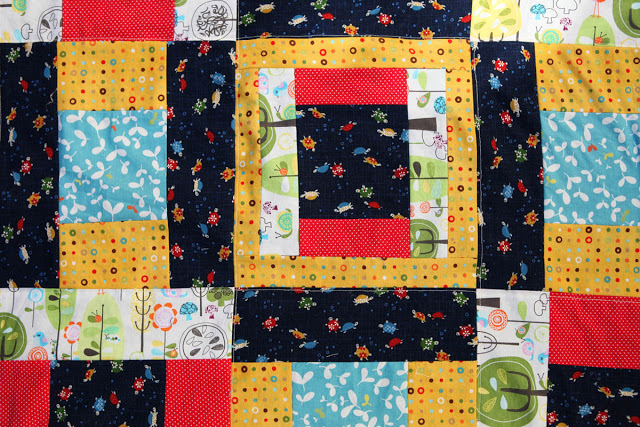
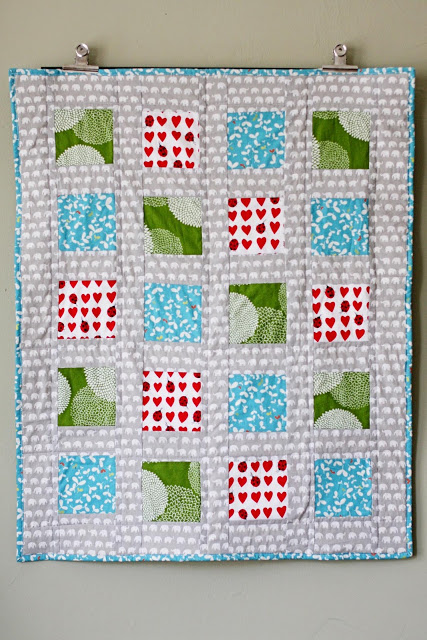
I want to work on disciplined quilting. My recent quilts, the ones with curvy design were practice in non-straight edges, but does allow for a bit of sloppiness in terms of fitting pieces together. The Window Pane quilt, not an original design of my own at all, is a traditional pattern, very geometrical. It will be very easy to see if the pieces were not measured/ cut/ sewn accurately.

The original point of quilting (I assume) was to use up little scraps of fabric to form a big blankety item, when large fabric pieces were scarce. So there was no luxury of large, curving pieces - instead, one could gather lots of little squares, rectangles and triangles. While I do have large bolts of fabric, this is a nod to the days of fabric scraps. BTW, this is a continuing story; if I wait until the quilt is done, I will have forgotten the details of How To and Progress.

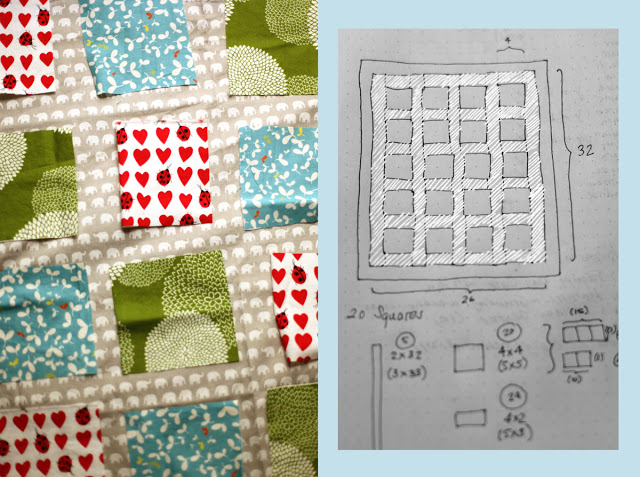
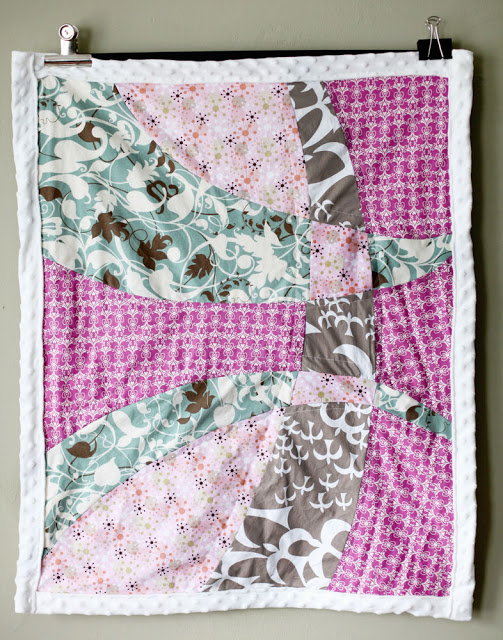
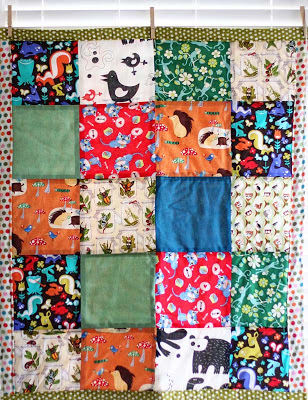
1. Drafting Design. I'd seen the window pane quilt around before, but didn't have a pattern, so I drew one out, and applied dimensions to the squares etc so that it would wind up to be baby blanket size. Note that this design is NOT simply a bunch of squares sewn on to one large piece of gray elephant fabric - that would be Applique, not Quilting. The elephant fabric will be cut into little rectangles that will fit between all the colored squares. It'll look way better this way, though it's much more work. There will be 5 loooong rectangles to fit between the 4 columns of squares and 24 mini rectangles to fill in the rest of the spaces.


2. Fabric Decisions. The background fabric is the least distracting, so the colored squares stand out. I toyed with some other fabrics before deciding on these three. Others were rejected on the basis of being too dark or light, or for having too large a print. These three have a saturated medium tone color, having similarly stylized blocky prints with white worked into the design.

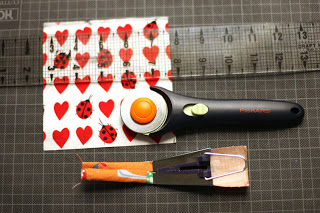
3. Cutting. My first use of the fabric cutting wheel. Like a pizza cutter. Much easier on carpel tunnel hands than scissors, and way faster. I also used a fabric pencil (draws easily and washes out on fabric), and measured out squares while incorporating space for seams. My squares are 4'x4', thus I cut out 5'x5' squares, assuming a consistent seam of 1/2'. Use large cutting board and long ruler.

4. This awesome tool: the Bias Tape Maker! I've not used it yet, but I'm really excited about it. Bias (fabric) Tape is not sticky like tape, but is a long strip of folded fabric to sew along fabric edges to prevent fraying. Like on blanket edges. This tool folds fabric strips, and you iron the folds down as the fabric emerges from the end. If you've ever tried to make bias tape by hand, you'll appreciate this little gadget! Oh, why "bias"? Supposedly you use fabric cut on the bias (ie, diagonal to grain) - better integrity or something. At this stage, I'm happy to use unbiased fabric strips to make tape. I am looking forward to putting such tape along the edge of my blanket, but that will be the last step.

Quilt Making is to Beer Brewing


Another baby quilt; same pattern as the previous but with minor aesthetic tweaks. And this one has batting - that is, the stuff sandwiched between the front and back of the quilt for additional insulation. The previous quilt had a Minky Dimple back, which I though provided enough weight. This one; cotton front and flannel back, needed an extra something to increase the cozy-factor.

When I inquire about my husband's creative endeavors, he like to compare them to my own, in simile. "Music Equipment is like Camera Equipment" for example. More recently, "Beer Brewing," he declared, "Is like Quilt Making." Oh really.
Choosing brew flavors and researching ingredients = Designing overall quilt and selecting fabrics that will go together
Calculating ingredient volumes, temperatures = Making a pattern
Actual brewing process = Sewing the thing together

So, I commented, after his fermenting 5 gallon glass jug erupted a ceiling smacking, geyser of beer guts all over the pantry, What is the Quilt Making Equivalent Here?
There was no satisfactory answer to that.


I documented some of the damage, exactly like in those investigators on CSI TV shows. Unfortunately, while I did witness the geyser - Dionysus's lesser known cousin, the Beer God of Fury, Reincarnate - it did not last long enough for me to grab a camera.

Sewing Machine Love


I'd been waiting to post this, as I want the recipient to see the baby quilt for reals, and not spot it first on my blog. According to USPS tracking, it is "Out for Delivery", which seems close enough.

It was time to graduate from squares to other shapes, so I went with arcs - but kept things simple. Pre-shank the fabrics. I cut a pattern out of a large rectangular sheet of foam wrap that in a previous life padded Ikea chipboard items, kept track of the pieces by labeling 1 through 15 and assigned fabrics. Tried to balance colors. Traced pattern pieces onto the backsides of fabric, added 1/2 inch boarders. Measured out the white fuzzy fabric (also known as Minky Dimple) to cover the back of the quilt plus wrap around to the front edges. Used my Sparkly New Brother CS 6000i to sew the parts together.

I must stop to gush: it is an absolute JOY to sew with a great sewing machine. My old machine, which I am embarrassed to own, was purchased on a quick trip to Target during my art school days, without prior research. Much like my intro DSLR, I did get a lot of mileage out of it - but recently I started longing for a machine that didn't regurgitate the bobbin every other use, shake my entire work station, erupt in sudden caffeinated bursts of uncontrollably fast stitches, or make such a machine gun din that my dog retreated to the furthest corner of the apt.  

CS 6000i is a COMPUTERIZED sewing machine, as opposed to purely mechanical. It means more precision. Pleasant, agreeable, perhaps even Eager to Please temperament, such smooth, even stitches, quiet purr, a bobbin that sits contentedly in its bobbin nest - Plus all these specialty feet (a walking quilting foot!) and programmed stitches... I could sew for days on end.

This is baby quilt #3. The corners don't quite meet; where the arcs cross one another, but whatever. I'm pleased with the result. Next time I will keep an eye on the fabric pattern direction though. The abstract birds and the swirly swirl fabric doesn't matter so much, but I am a bit bothered by the deep pink, which runs in different directions.

Biology Themed Quilt


I whipped up another mini-quilt, for a friend who is a Biology professor. Of the evolution/ecology sort, not the molecular/genetic sort, so I made sure to include lots of animals. Not that I'd not include animals in quilts for babies produced by non Biology professor parents. My favorite fabric is the (anatomically correct) bugs-in-jars print. I found it online and was so delighted, I bought piles of it before I knew what to do with it.

May I make a small digression - so often, ants are drawn incorrectly. I'm not saying that all ant drawings should be scientific illustrations. But a basic basic detail is always misrepresented: antennae are attached UNDER the eyes of an ant face; ie, if you were an ant, your antennae would sprout perhaps halfway between the inner corner of your eye and nostril. Maybe at highest Next to the eye, but certainly not on the Forehead, like so many cartoons shamelessly depict. I'm only really picky about ants (which by the way, are all female - you'd pretty much never see males, so Bug's Life? Antz? All wrong, all wrong!). Other animals can be misrepresented.

I learn a little more with each quilt I make. I thought I had everything figured out, but then the last column of squares turned out skinnier than the others. Alas! I will know better next time. And maybe, I will graduate to include triangles shaped fabric pieces in my quilts.

In the same way that I look at amateur photos and automatically think: what a cliche composition! look at that dusty lens! the white balance is off! it's not even focused! I'm sure an experienced quilter looks at my quilts and thinks: the squares aren't square! how boring a pattern! the edging isn't straight or even! what a hodgepodge of colors! the thread knots are visible!

My First Quilt


I'm going to be an auntie. As of this Autumn sometime. What else do aunties do besides make cool stuff for their nephews/nieces? I made this crib-sized quilt last weekend, but didn't get to report on it until now, because it was a surprise present, and the recipient's mom reads my blog. She received it today (a day earlier than scheduled - well done UPS)

The nursery theme is Yellow Submarine. And so, I google Yellow Submarine fabric, and wouldja know it, there is a whole set of Yellow Sub theme fabric to choose from! If you click on the image to zoom in, you'll see the blue and orange panels have a scattering of characters from YS. I added in some plainer yellow and blue squares so that it wasn't so eye-boggling. The black and white animal squares - that's Ikea fabric (Ikea kids' section has awesome fabric!) and the blue cats on red? Well my in-laws have a cat. An orange cat, but I couldn't find cool orange cat fabric, so blue cats it was.

The big panel is one piece, like a fabric poster. I know, cool huh! So. I cut up a bunch of squares, 20cm x 20cm (I'm still much more accustomed to metric, thanks to British school upbringing). I cleared our large coffee table to lay out the squares (I could use the floor, but the squares would pick up dog fur) and arranging them so the colors formed a balanced composition. Then I machine sewed rows together, winding up with six strips of five squares. My husband actually helped and ironed the squares (round of applause! but I fear this bit domestic activity was overwhelming and he soon departed to home brew beer with friends). Then the six strips were sewn together to make a big rectangle - this is the fun part, watching it all come together.

The big poster panel and the rectangle consisting of many squares are then sewn together to make something like a pillow case, whereupon I spread a rectangular sheet of batting inside. Batting is the fluffy stuff. Close up the open end of the pillow case, and then comes the next fun part - sewing a free form curly pattern over the entire blanket, so that the thread pierces all three layers. This is what makes the quilt look puffy.

Given this was my first quilt, I steered away from more complicated designs, such as fitting hexagons together, or putting in circles, or anything other than standard squares (even they gave me a hard time lining up properly).

I've decided that I like quilt making. You could just buy a baby blanket. There are lots of cute ones out there. But the great thing about quilting is the personalization. Say you're hoping your baby will like: trumpets, robots, squirrels, cupcakes, hockey and hello kitty. All those things can be found printed on different fabrics, and one can make a completely personalized quilt.