It's been a week since I last posted, apologies to my regulars. In the last week, I didn't produce any photos that I was particularly pleased with, and thus wasn't inspired to post.
I recently applied for a freelance illustrator job that I spotted on Craiglist. A children's story-telling theater group is looking for a children's book illustrator for a story about a baby coyote. They requested sample drawings of a crying baby coyote, a grandma coyote, and a cactus. So here they are. Hard to figure out how to make a coyote grandmotherly, besides spectacles and some eye crinkles (which on second thought look like eyelashes). She's a sassy grandma. Have yet to hear back...


My first celebrity photo features Jennifer Tilly. The San Diego Film Fest event organizer people gathered the press around the screen thing (white backdrop with sponsor's names; there's a proper name for that thing but I can't think of it just now) and would make intermittent announcements to us: She's on her way! She's getting out of the car! While waiting, I asked a photographer and videographer standing next to me if they knew who she was, and they both shrugged. I later checked her out on IMdb and she's done quite a lot of movies, though the only one I've seen is Monsters Inc where she was the voice of Celia. This photo was taken after she won an award (best actress?) for her role in Intervention, I believe. It's hard to pay attention to details like movie names when I'm busy trying to get a good picture. Anyways, Jennifer was very sassy and made more creative poses than other actresses who merely looked adoringly out into the media crowd.


There are hazards to photographing mermaids, namely, getting one's camera splashed on. These two were spotted in the Ivy Hotel's rooftop pool, when the San Diego Film Festival premiere party was just starting to pick up. It is notoriously difficult to get photos within the Ivy, a very chic, downtown San Diego hotel, but exceptions had been made for the SDFF event. My press pass got me into the VIP section, where I wove between designer dresses and Soprano worthy suits to request posed pictures or sneak candid shots.


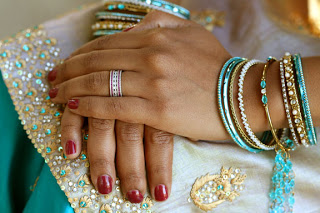
I did my first set of engagement photos for some friends over the weekend. Besides the couple, one of the main subjects of engagement photos is often the ring (or in other cases, animal friends). It took a few trials before achieving a photogenic hand positioning. Hands, if photoed from certain angles, start to look weird if one looks at them for too long, similar to how some words look strange after staring at it for a while. Anyways, I liked this shot because it showed off the bracelets and detail of the traditional dress.


It's almost time for Haunted Aquarium at the Birch, which means the scarier, odder looking marine creatures will soon have the limelight! These fish are deep sea dwellers, and most have means of bioluminescing to communicate. From top left, clockwise: Gulper Eel, Flashlight Fish, Hatchet Fish, Viperfish and Angler Fish. These were brush/pen & inked, scanned and vectorized, and enlarged to a kid-coloring-friendly size. Kids like to color within fat lines, I've noticed, so I tried to make the outlines particularly heavy.

Even though I live in San Diego, I rarely get down to the beach which is a shame. I made it to Torrey Pines State Reserve to take photos for DiscoverSd.com. TP has a beautiful rugged beach, overlooked by wind and water carved cliffs. Sunset makes for great photos.


I now have a Canon EF 100mm f/2.8 Macro USM lens. Basically that means I can take photos of really small things like ants, as well as good portrait shots because of the small depth of field; ie., things will be fuzzy in the background, and the person/dog in the foreground will be crisply clear. I went out into the back yard to see what I could capture, as soon as I unwrapped the lens. Not sure what these Argentine ants are doing on my flowering thyme, but they made for a good test subject. The challenge is to hold the camera as steady as possible when photographing small things, as the area in focus is so specific. All the more difficult when insects are moving around. Not the best pic, but I'm just trying things out...


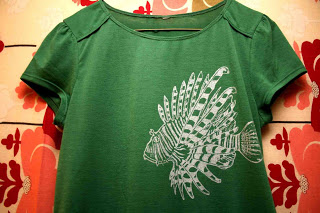
This is the resulting screen printed T-shirt. It is always hard to part with my artwork, but parting with printed pieces is easier (I can print another one!) Also, I'd promised my friends cool screen-printed items in thanks for dog-sitting my dog. The design is actually based on an old drawing I made about 10 years ago.

How to screen print a t-shirt


Materials:
Screen (I like Blick 12XX pre-stretched frames)
Cheapo Paint Brush
Drawing Fluid (I use Speedball)
Screen Filler (Speedball again)
Screen Printing Tape (water resistant tape)
Rubber squeegee (at least as long as design width)
Small Spatula and/or Plastic Spoon
Large Sink or Bathtub
Pre-washed t-shirt, dried without dryer sheet (start with undesirable practice T, though)
Fabric Screen Printing Ink (Speedball)
**Supplies purchasable from online art stores like dickblick.com.**

1. Think of a design. Print/ draw it out, and figure out what parts will comprise the negative and positive spaces.

2. Place screen over design, but elevate it so that it is a 1/8 inch or so above your design (prop screen up on chopsticks, perhaps). Using cheap paintbrush, use Drawing Fluid (DF) to fill in POSITIVE SPACE.

3. Let it dry. Make sure it's completely dry before next step. Use hairdryer if impatient.

4. Tape edges of screen to form a tape frame around design. Prop up screen slightly (e.g. one end lifted up by toothpaste box on side). Shake Screen Filler (SF) and pour out a strip of SF along the top of the design (it's viscous enough that it won't run downhill).Using a firm grip on the squeegee, spread SF down over design, covering all area within tape. Do one more swoop upwards. No more than 2 swoops or the DF will start dissolving prematurely. Wash/dry squeegee.

5. Allow to dry completely. Then rinse: DF will dissolve away, leaving water insoluble SF to block out negative space, like a stencil! Neaten if necessary; dab SF on missed spots. It's hard to remove dried SF... I use a pin tip and run it gently against the screen. Dried SF will flake off in tiny bits (Very tedious; not for uncovering large areas).

6. You're ready to print. Place scrap paper/magazine page inside t-shirt to prevent ink from staining other side of T. Place screen on T, on sturdy horizontal surface. Use spatula/spoon to dollop ink in a strip across top of design. Be generous - you can salvage excess ink later.

7. Use one hand to hold screen down in place, use other hand to firmly swoop squeegee down screen so the ink spread over the design. Reverse pass, then repeat. I'd say 3-4 swoops total (up, down, up, down) is enough, but it depends on the fabric; some take ink faster). Peel off screen slowly. If you are ink-miserly like me, use spatula to scrape excess ink from screen & squeegee and put back in ink container. Immediately rinse screen, squeegee and spatula thoroughly. Do NOT let ink dry on your screen.

Allow first print to dry before printing again on same T. Make sure screen is dry when re-using. When design is complete and dry, iron inside out for around 2 minutes to set ink.




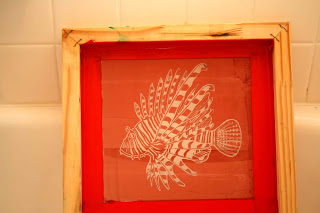







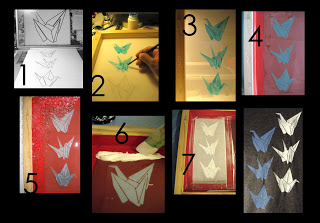
I finally got around to trying out my new silk screen design. I had intended to photograph the stages of screen-making, but I forgot. Fortunately, I have more screens planned. No special technology is needed for screen printing. It's all about blocking out negative space; creating a stencil on a screen. The mesh is there to even out the ink distribution.

At first I considered black ink on green. I dabbed some black ink on the inside of the T-shirt and thought the contrast was a bit too subtle for all the detail I'd put into the screen. Why not silver and green? An unusual combination... I think it works. When it dries I'm slapping another lion fish on the back of the T-shirt.


Friday night I photographed the Reef fashion launch party at the San Diego House of Blues. Live visual art, as well as live music, seems to integral to all the popular events these days. Here, an artist pauses to view an oversize piece that he and his collaborators are working on. Meanwhile all around them, the crowd swirls to dance music, and I try to be as unintrusive as I can with my shots. Usually photos of people's backs are not very exciting, but this pic I think, is redeemed by the interesting adornment of the back, and also the juxtaposition of the backs with the forward facing painted faces on the mural.


On Sunday I photographed Thread, a fashion/ shopping event featuring 100+ independent fashion and accessory designers. The event was held at the aerospace museum atrium in Balboa park, which has a glass ceiling and made more nice photo lighting. It was co-hosted by discoversd.com, for whom I am a photo intern.

It is hard to shop and photograph at the same time, because each activity requires the use of different aesthetic radars. Photographing concerns making a good composition out of everything, even if I'd be unlikely to wear the product myself (such as the dress on the model above), shopping concerns zoning into what I personally think looks good. Sometimes the two interests coincide, as in the case of the second photo, featuring beautiful glass pendants hand-made by artist Lisa Ann Sparks.

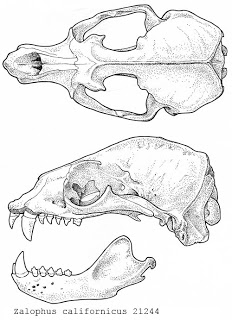
Canis familiaris, the domestic dog. This one was a miniature poodle, to be specific. There are enough dog skulls found in the county to warrant its inclusion in the mammal atlas. I think some people who find canid skulls get excited and think they've got a fox, or coyote, but actually it's just someone's old pet...


After a long, impossibly hot weekend, I was inspired to put together previously drawn elements into an image with a cooling effect. All the kelp and the garibaldi were created for the Birch outreach van, but I thought a kelp forest scene was worth putting together in itself. I was planning to add more animals. As it turns out I rather like the garibaldi on its own. The luxury of photoshop allows me experiment of course, so I will post other kelp forest compositions as they evolve.

I've spent the past few days doing some online research about lenses and flashes, and finally decided to invest in a canon 430EX flash. It fits into the hotshoe (flash attachment thing) of canon rebels, can be manually controlled, can point in different directions etc. It won't arrive until next week, but I'm looking forward to experimenting and hopefully seeing an improvement in my flash photos.

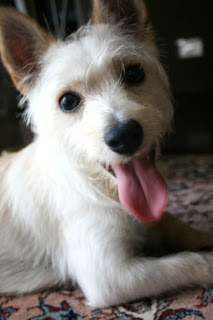
This photo features Gromit, a friend's dog. He kept moving, and given my current flash incapabilities, I tried to catch him while he rested near a window. Alas, his nose and tongue are fuzzy.


Back to the mammal skulls, this time featuring a seal and a sea lion, respectively. What's the difference? Apparently, different evolutionary lineages, and different resulting features. The characteristic that I always remember is that seals don't have external ears, whereas sea lions have little ear flaps. They move differently on land too: seal lions use their flippers to get about (and their front flippers are bigger than seals') whereas seals sort of slide/flop along, inchworm-like perhaps.


I made these brittle star stuffed animals way back in March, but didn't photograph them until now. They've actually done a good job of withstanding several months of kids' play. The material is thick and synthetic, and I double stitched everything. The centers (about 8 inches in diameter) are like stuffed pin cushions, and the arms are filled with plastic and wooden beads. Apparently, there aren't any stuffed animal brittle stars on the market; that's why the Birch education dept asked me to make them a few.


Compare and contrast. The original tide pool design was passed around amongst aquarium folk, and I got the following feedback: too crowded, too much going on, can you make it look more rocky? So, I dropped the horizon, reduced some of the pink sponge presence, thinned out the black outlines and erased a few sea stars. I think the new version (top) is more calming to look at than the old version, which is jungly.


This is a collage of excerpts from photos of clubs, pubs and bars in San Diego, from my collection of images intended for the DiscoverSD.com directory of businesses. I've now covered some 50-60 odd bars, from classic hole in the walls to restaurant/brewery combos. Most places I could easily mix up; they all have the standard pool table or 2, a bar and a TV.


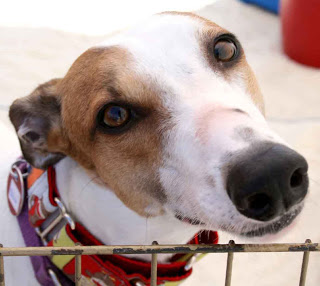
I went to the Big Dog Adoption Event today at Fiesta Island. With a name like Fiesta Island, I picture tiki-style huts with colorful lights strung through out, and maybe palm trees and plentiful margaritas. Actually, it's mostly sand, with pretty much no shade. The BDAE was a semi circle of about 15 tented stalls, each featuring at least 4-5 dogs. There were more german shepherds and german shepherd mixes than any other breed. There were also black labs, pitbulls, akitas, hounds and rotties. I was most charmed by the greyhounds however; retired greyhounds rescued from Tijuana racetracks. Some had recovered from broken legs; apparently speeding around sharp curves can cause thin legs to snap. Once that happens, they're useless for racing of course. The female greyhound in the top photo was a very sweet dog. There were also a lot of older dogs, 8 years +, looking for homes.